Every password sitting in a partner’s SFTP config is a support ticket waiting to happen - and a breach waiting to be disclosed. Oracle Integration Cloud (OIC)'s built-in File Server can shut that door for good.
Passwords were never built for machine-to-machine file transfer, yet most partner SFTP integrations still run on them. Oracle Integration (OIC) ships with its own embedded SFTP server - File Server - and when you pair it with SSH key authentication, every external partner connects with a cryptographic key instead of a shared secret. No password to rotate. No credential to leak. No shared secret sitting in someone else’s config file.
This guide covers:
-
1. Why SSH keys beat passwords for partner and B2B file transfer
-
2. Exactly how Oracle Integration Cloud's public/private key handshake works
-
3. The four-part setup: generate keys, enable File Server, configure the user, connect
- 4. The troubleshooting fixes for the five most common failure points
By the end, you’ll have a File Server that authenticates every inbound connection with a signed challenge — not a password anyone can guess, phish, or forget to rotate.
Companion post: Part 2 — Wire OIC’s FTP Adapter for SSH Key Authentication covers the mirror scenario, where OIC is the SFTP client connecting outbound.
Why Passwordless File Transfer Matters
Credential theft remains one of the most common entry points attackers use in hacking-related breaches, and shared passwords sitting in SFTP configs are exactly the kind of static secret that gets phished, leaked, or simply forgotten about on an old server. SSH key authentication removes that entire class of risk from the equation:
-
1. No password on the wire. The client proves its identity by signing a cryptographic challenge — nothing resembling a shared secret is ever transmitted or stored on the server.
-
2. Nothing to rotate, nothing to forget. There’s no password-expiry policy to break your partner integrations at 2 a.m.
-
3. One key, one identity. Each partner or service account gets its own key pair, so access can be revoked individually without resetting anyone else’s credentials.
-
4. Audit-ready by design. Every connecting identity maps to a specific, traceable public key on the File Server user — not a password that could belong to anyone who’s ever seen it.
The result: a File Server that’s genuinely password-free, without adding a single moving part for your partners to manage.
How the Public-Key Handshake Works
The roles here are the reverse of a typical outbound SFTP connection: OIC’s File Server is the server, and it holds the public key. The external SFTP client holds the matching private key and proves its identity by signing the server’s challenge. The private key never leaves the client, and no password is ever exchanged.
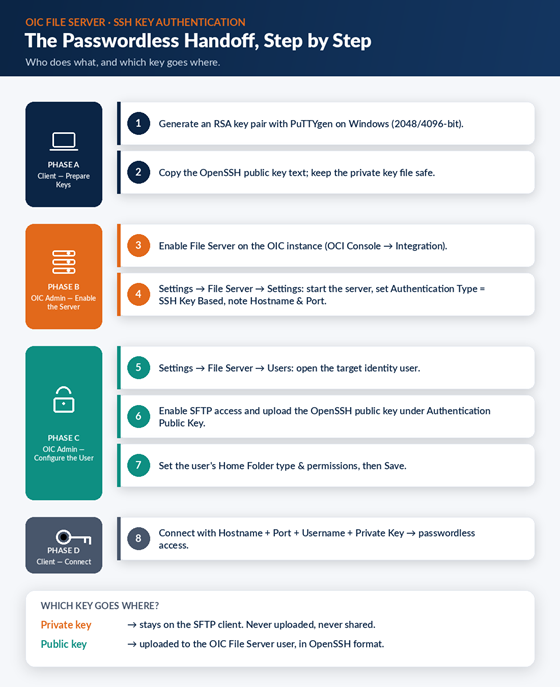
At a glance: the client’s public key gets loaded onto the OIC File Server user (in OpenSSH format); the private key stays exactly where it is — on the SFTP client, never uploaded, never shared.
What You’ll Need
- 1. An OIC instance with File Server enabled (an instance-level setting in the OCI Console).
- 2. Administrator access to Settings → File Server in the OIC console.
- 3. The client’s OpenSSH public key text (the single-line ssh-rsa AAAA... string).
- 4. An identity-domain (IDCS/IAM) user to grant File Server access to.
Part 1 - Prepare the Key Pair (Client Side)
The client generates the key pair with PuTTYgen. For File Server, they only need to hand you the public key — specifically the OpenSSH authorized_keys text shown in PuTTYgen’s top box (ssh-rsa AAAA...).
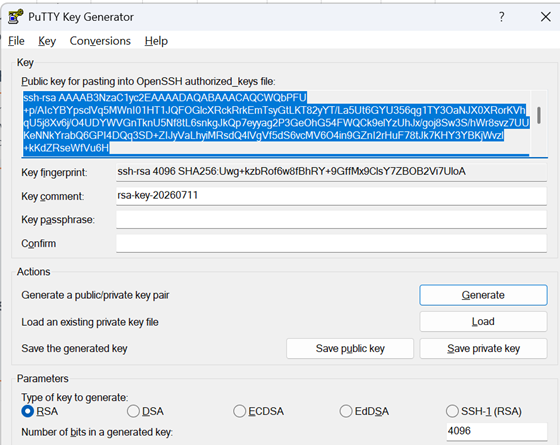
Copy the OpenSSH public key text from PuTTYgen - this is what OIC needs.
Load the public key here - never the private key. The OIC File Server user only ever receives the public key. The private key stays with the SFTP client. Use the OpenSSH single-line format, not PuTTY’s own “Save public key” file.
Part 2 - Enable the OIC File Server
2.1 Turn on File Server at the instance level. In the OCI Console, go to Developer Services → Integration, open your OIC instance, click Edit, and enable File Server. Save and let the instance update.
2.2 Start the SFTP server and capture the connection details. Open the OIC console, then Settings → File Server → Settings. Under SFTP Server Status, click Start, and note the Hostname/IP address and Port — your partner’s SFTP client will need both.
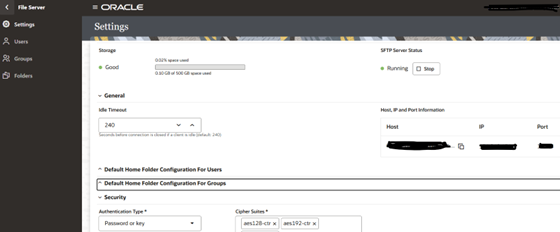
File Server Settings: server started, hostname and port noted.
2.3 Set the authentication type to SSH Key Based. Still on the Settings page, under Security, set Authentication Type to SSH Key Based (or Either, if password login should also stay available). Save.
Two things worth knowing: the per-user Authentication Public Key field only appears once Authentication Type is set to SSH Key Based (or Either). File Server also does not support FTP Multi-Level Authentication — it’s password, SSH key, or either.
Part 3 - Configure the File Server User and Load the Public Key
3.1 Open the user. Go to Settings → File Server → Users. This list is populated from your identity domain (IDCS/IAM) — you’re enabling existing identity users for File Server, not creating new SFTP accounts from scratch. Find the target user and click Configure.
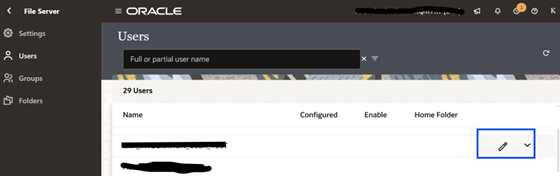
Users page: click Configure on the target user.
3.2 Enable SFTP access and upload the public key. Toggle the slider to enable SFTP access, then upload (or paste) the client’s OpenSSH public key under Authentication Public Key.
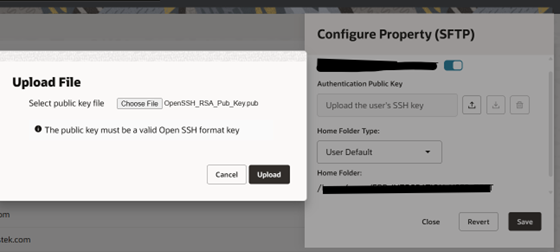
SFTP access enabled and the OpenSSH public key uploaded for the user.
3.3 Set the home folder and save. Choose the Home Folder Type, confirm the folder path, and click Save. The user now shows as enabled for the SFTP server.
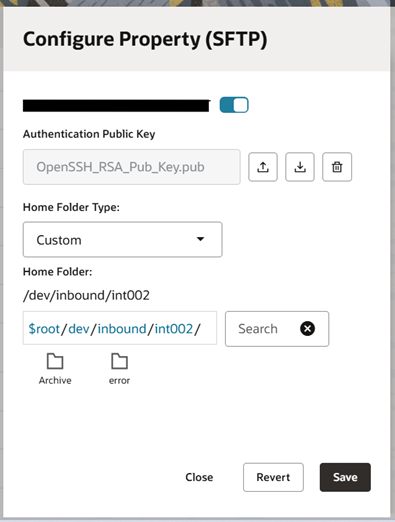
Home folder type and authentication set, then Save.
3.4 Set folder permissions. Expand the active user to review permissions on the home folder, or click Permissions to change them.
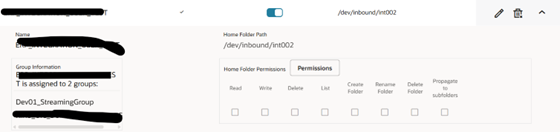
Check permissions, then edit if needed.
On the Permissions screen, click Add Permission, select the user under the Users tab, click Add, and assign the access level needed.
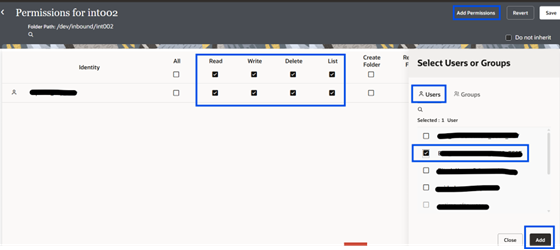
Set permissions, then save.
Part 4 - Connect from the SFTP Client with the Private Key
On the client, open an SFTP tool (WinSCP, FileZilla, or similar). Create a connection using SFTP, the hostname/IP and port from Step 2.2, the configured username, and select the private key. No password required — just accept the host key on first connection.
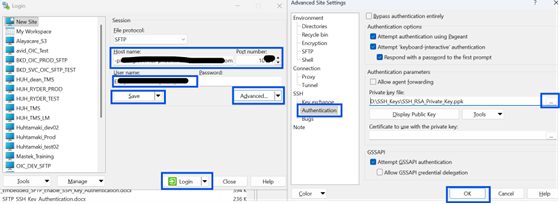
SFTP client configured with host, port, username, and private key.
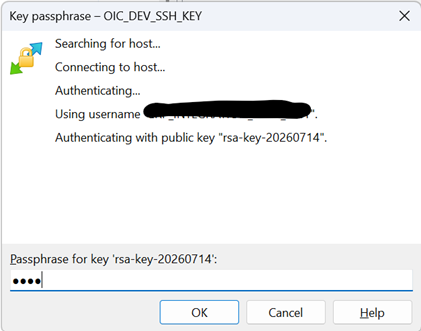
If the key was created with a passphrase, the client will prompt for it.
A successful login lands the client straight in its home folder - passwordless, key-authenticated access to the OIC File Server.

Passwordless login succeeds, landing in the user’s home folder.
Troubleshooting Common Issues
|
Symptom |
Likely cause & fix |
|
No public-key field on the user |
Authentication Type on the Settings page is still Password. Set it to SSH Key Based (or Either), save, then reopen the user. |
|
Server won’t accept the connection |
File Server isn’t started (Settings → SFTP Server Status → Start), or the instance-level File Server option isn’t enabled in the OCI Console. |
|
Auth fails despite key upload |
User isn’t enabled for SFTP, the username is wrong, or the uploaded public key doesn’t match the client’s private key. Re-copy the OpenSSH public key text. |
|
Client can’t reach host/port |
Confirm the hostname and port from the Settings page, and that outbound access to File Server is allowed from the client network. |
|
Lands in the wrong or empty folder |
Check the user’s Home Folder Type and permissions; grant read/write on the intended folder. |
Key Takeaways
1. File Server makes OIC the SFTP host - the external client authenticates with its private key, not a password.
2. Enable File Server on the instance, start it, and set Authentication Type = SSH Key Based before configuring users.
3. Load the client’s OpenSSH public key on the File Server user under Authentication Public Key - never the private key.
4. The client connects with hostname, port, username, and its private key - no shared secret ever touches the wire.
Passwordless doesn’t mean unmanaged - it means every partner connection is tied to a specific, revocable key instead of a secret anyone could be holding. That’s a meaningfully smaller attack surface for every file that crosses your integration boundary.
Ready to make every partner SFTP connection password-free? Book a free OIC Security & Integration Readiness Consultation with Mastek’s Oracle experts.
Next in this series: Part 2 — Wire OIC’s FTP Adapter for SSH Key Authentication, covering the outbound side -generating keys with PuTTYgen and configuring OIC’s FTP Adapter to authenticate with a private key.